- To create a passkey on Windows 11, open the service or app account settings, click the create passkey option, and confirm your Windows Hello credentials.
- To sign in with a passkey, open service (or app), choose the passkey sign-in option, and confirm your Windows Hello credentials.
-
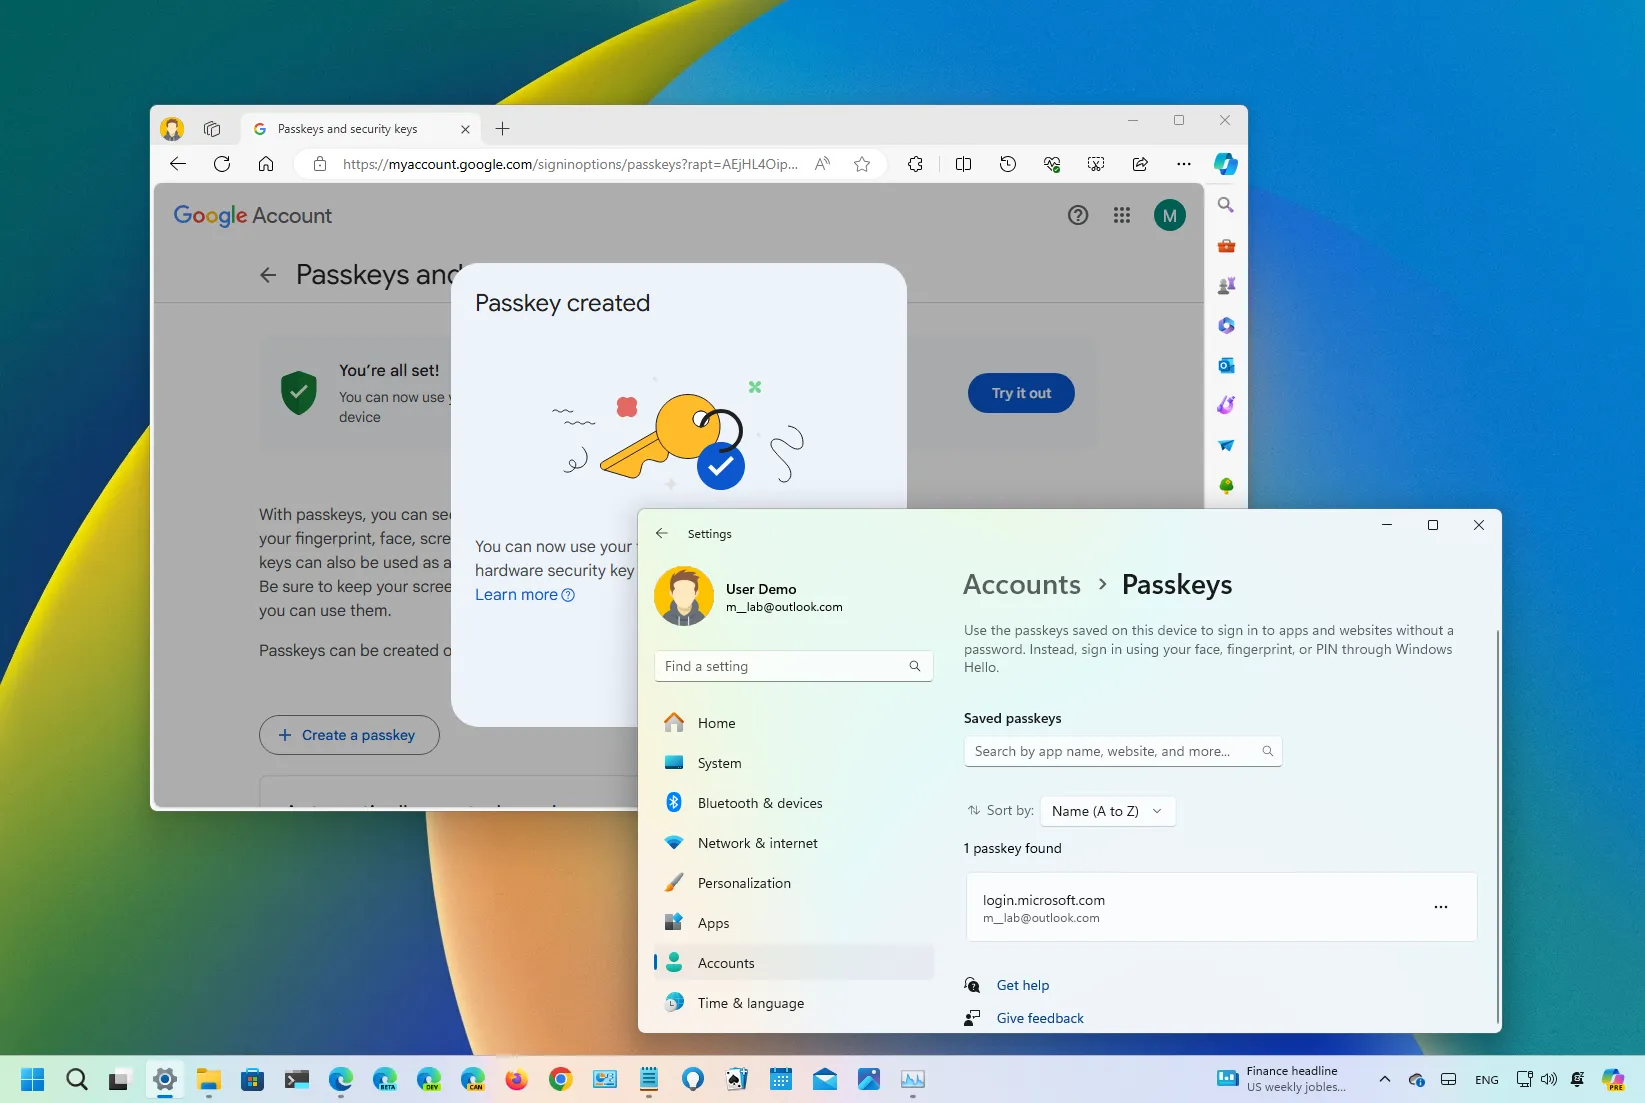
To view and delete a passkey on Windows 11, open
Settings
>
Accounts
>
Passkeys
, open the credential menu and click the
“Delete passkey”
button.
On
Windows 11
(version 22H2 and higher releases), the operating system includes support for
“passkeys,”
and in this guide, I will teach you how to create and use this feature.
“Passkeys” are a secure alternative to passwords when signing in to websites (and apps) supporting this authentication standard. This feature isn’t specific to Windows 11 since
Apple
and many other platforms also support this standard, including
,
X
(formerly Twitter),
eBay
,
Amazon
,
,
, and
PayPal
.
A passkey is technically a token you can create on your website account and download on
Windows 11
(in this case) using Windows Hello. The next time you have to access the website, instead of using the password, you can use your Windows Hello PIN,
Fingerprint
, or
Face to sign in
with the passkey. This approach makes your account more secure since the password is not part of the process, making it harder for hackers to compromise your credentials. Microsoft says passkeys “are phish-resistant, recoverable, and faster for users.”
In this
guide
, I will teach you how to create and manage passkeys natively on Windows 11.
-
Create and save passkey on Windows 11
-
Sign in using passkey on Windows 11
-
Manage saved passkeys on Windows 11
Create and save passkey on Windows 11
To create a passkey for a web service (or app) on Windows 11, use these steps:
Open
Microsoft Edge
(or
Google Chrome
).
Open the website with passkey support, such as
Google Account
.
Sign in and open the web service account settings.
Click the
“Passkeys and security keys”
setting.

Click the
“Create a Passkey”
option.

Click the
“Create a passkey”
button.

Confirm your account credentials on Windows Hello.

Click the
OK
button.
Click the
Done
button.
Once you complete the steps, the passkey will be created and securely stored on your Windows 11 installation. The next time you want to access the service (or app), you can use Windows Hello authentication to complete the sign-in process instead of using the service password.
It’s important to note that some services may prompt you to create a passkey as you sign in to your account. If you accept, the process will also be slightly different and may take fewer clicks.
Interestingly enough, you can create a passkey for a
Microsoft account
using the
“Add a new way to sign in or verify”
and choosing the
“Face fingerprint, PIN, or security key”
option, but you won’t be able to use Windows 11 to create and save the passkey. Instead, the service will prompt you to use your iPhone, iPad, Android device, or security key.
Sign in using passkey on Windows 11
To use a passkey to sign in to site or app, follow these steps:
Open
Microsoft Edge
(or
Google Chrome
).
Open the website (or app) with passkey support, such as Google Account.
Click the
“Try another way”
option.

Click the
“Use your passkey”
option.

Click the
Continue
button.
Confirm your
Windows Hello
credentials.

After you complete the steps, you will be signed in, similar to using your password.
Manage saved passkeys on Windows 11
To view and delete Passkeys on Windows 11, use these steps:
Open
Settings
on Windows 11.
Click on
Accounts
.
Click the
Passkeys
tab.
Confirm the available passkeys for your web services and apps.
Click the three-dots button on the right and choose the
“Delete Passkey”
option.

After you complete the steps, the Passkey for the web service or application will be deleted from your computer.
FAQs
No, the standard is available on Windows 11 22H2, 23H2, and higher releases. Also, at the time of this writing, you can only use it through Microsoft Edge and Google Chrome. Other browsers, like Firefox, do not support the standard.
If you have also created a passkey on your phone, you can use it to sign in to your account from Windows 11 by scanning the barcode on the screen.
No, you only need to create one passkey for each device. When you create a passkey, the information is saved on the computer, and the system will make it available to every supported browser seamlessly.
If you lose your phone, you can still access your account using the passkey stored on your computer. If you haven’t created a passkey on your computer, you can continue accessing the service with a regular password.
It’s important to note that a passkey is unique for each device, so you must create a new passkey for each device on which you want to access the service. If you have already created a key on Windows 11, you can repeat the process on your phone or use the “Use another device” option to create a new key for another device from your computer.
When using a passkey, you do not remove the password authentication method from the service or application. You are only creating a token to make it easier for you to sign in and minimize the chances of your credentials being compromised. If your password is compromised, the malicious individual can access the account. If you know that your password has been compromised, it’s best to change it immediately.
Are you using “passkeys” on supported sites and apps with Windows 11?
Let me know in the comments below.
Update May 10, 2024:
This guide has been updated to ensure accuracy and reflect changes to the process.