-
To rename a printer on Windows 11, open
Settings > Bluetooth & devices > Printers & scanners,
choose the printer, click
“Printer properties,”
and confirm the new name. -
On Windows 11 24H2, open
Settings > Bluetooth & devices > Printers & scanners,
choose the printer, click
“Additional printer settings,”
confirm the new name, and click
“OK.”
- To complete this configuration, you can also use the Print Management console, Command Prompt, and PowerShell.
- The Control Panel method is no longer available as Microsoft ported the option to the Settings app.
On
Windows 11
, there are multiple ways to rename a printer. In this guide, I’ll show you five ways and the new steps starting with version 24H2.
Although you can choose your printer’s name during its setup, nowadays,
printing and scanning devices install
automatically with default settings, including a default name, which can sometimes be long and not humanly descriptive.
If you want to change the name to
share the printer
with a friendly name or make it easier to identify if you have multiple printing devices, Windows 11 includes various methods to complete this configuration from the Settings app (depending on your version of the operating system), Print Management, Command Prompt, and PowerShell.
In this
guide
, I will outline the different ways to assign a different name for your printer on Windows 11.
Rename your printer on Windows 11
On Windows 11, you have at least five ways to change the printer settings, including its name, and here’s how.
Ensure the printer is online before proceeding with these methods to avoid issues.
1. From Settings on version 23H2
To change the printer name on Windows 11 23H2 and older versions, use these steps:
Open
Settings
.
Click on
Bluetooth & devices
.
Click the
Printers & scanners
page.
Choose the printer.

Click the
Printer properties
setting.

Confirm the new printer name.

Click the
OK
button.
Click the
Apply
button.
The setting to change the printer properties is no longer available through the Control Panel. If you open
“Hardware and Sound”
and
“Devices and Printers,”
you will be directed to the Settings app. However, on version 23H2, you will access the legacy properties to rename a printer.
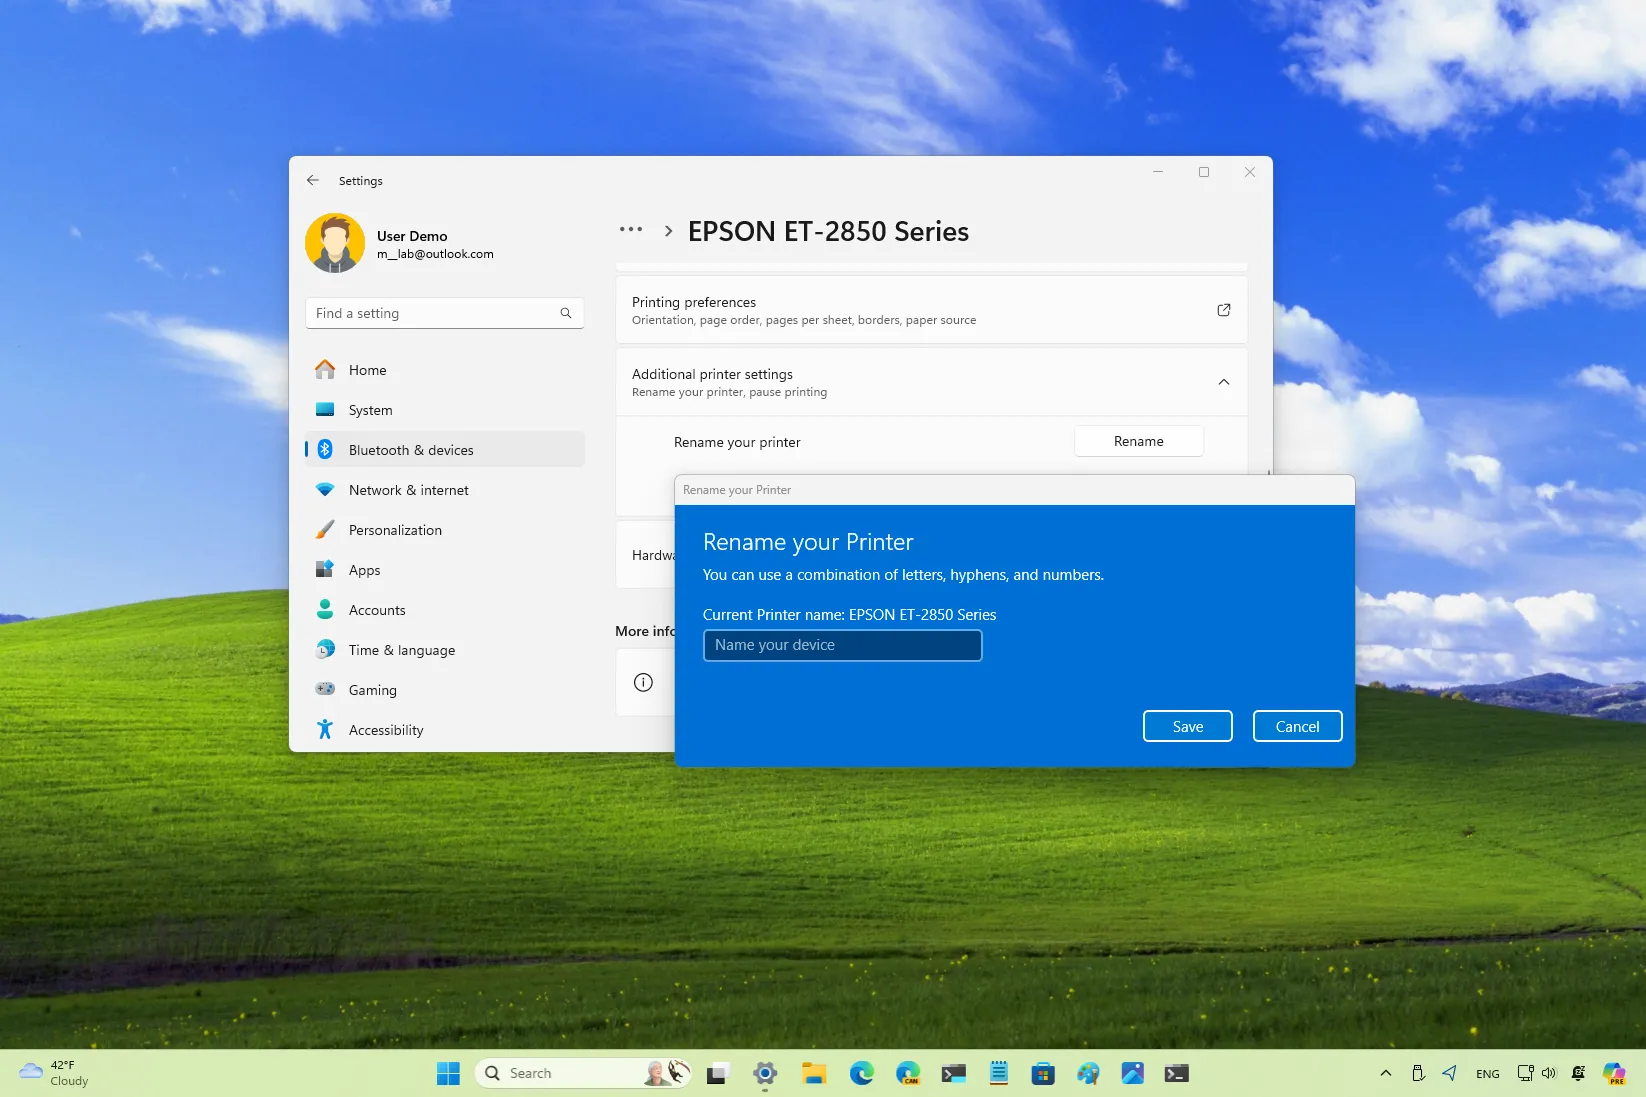
2. From Settings on version 24H2
To rename your printer from the Settings on
Windows 11 24H2
, use these steps:
Open
Settings
.
Click on
Bluetooth & devices
.
Click the
Printers & scanners
page.
Choose the printer.

Click on
Additional printer settings
.
Click the
Rename
button for the “Rename your printer” setting.

Confirm the new printer name.

Click the
Save
button.
The
“Rename your printer”
setting is only available on Windows 11 24H2 and higher releases. You can
check the version of your operating system
with these instructions.
3. From Print Management
To assign a different name for your printer through the Print Management console, use these steps:
Open
Start
.
Search for
Print Management
and click the top result to open the app.
Click on
All Printers
from the “Custom Filters” category.
Right-click the printer on the right and choose the
Rename
option.

Confirm the new name and press
Enter
.

The console is only available on Windows 11 Pro
, so you cannot use these instructions in the Home edition of the operating system.
If you can access Print Management from this console, you can also
completely remove a print driver
on Windows 11.
4. From Command Prompt
To rename a printer through Command Prompt, use these steps:
Open
Start
.
Search for
Command Prompt
, right-click the top result, and choose the
Run as administrator
option.
Type the following command to list the installed printers and press
Enter
:
Type the following command to change the printer name on Windows 11 and press
Enter
:

In the command, update
“CURRENT-NAME”
and
“NEW-NAME”
with the old and new names. The
“Prncnfg.vbs”
file is actually a Visual Basic script designed to configure or display printer details, and in this case, you can use it to change the print device name.
The command will update the printer globally throughout the system.
5. From PowerShell
To change the printer name with PowerShell commands, use these steps:
Open
Start
.
Search for
PowerShell
, right-click the top result, and choose the
Run as administrator
option.
Type the following command to view the installed printers and press
Enter
:
Type the following command to change the printer name on Windows 11 and press
Enter
:

In the command, update
“CURRENT-NAME”
and
“NEW-NAME”
with the old and new names.
If you encounter problems renaming a printer, make sure you are running Command Prompt or PowerShell as an administrator.
While these instructions are specific to Windows 11, you can use the Command Prompt and PowerShell methods on
Windows 10
.