-
You can now uninstall Copilot from
Settings
>
Apps
>
Apps & features
, choose the
“Copilot”
app, and click on
“Uninstall.”
-
To disable the Windows 10 Copilot, right-click the Taskbar and clear the
“Show Copilot (preview) button”
option. -
To remove Copilot completely, open Group Policy
User Configuration
>
Administrative Templates
>
Windows Components
>
Windows Copilot
, and choose the
“Enabled”
option in the
“Turn off Windows Copilot”
policy to disable the feature. -
To disable the Microsoft Copilot from the Registry on Windows 10, open
“HKEY_CURRENT_USER\Software\Policies\Microsoft\Windows\WindowsCopilot,”
and set the
“TurnOffWindowsCopilot”
DWORD to
“1.”
On
Windows 10
, you have three methods to disable Copilot system-wide or remove the button from the Taskbar, and in this guide, I’ll outline the steps I used to complete this configuration. Similar to the experience on
Windows 11
, the older version of the operating system
now also includes Copilot
, the chatbot AI designed to assist you with any question and other tasks, such as rewrites, summarization, generating new content, and more.
Although Microsoft doesn’t want you to get rid of the feature, if the feature isn’t for you, there are multiple ways to disable the Windows 10 Copilot through the Taskbar context menu, Group Policy, and Registry.
On Windows 10 Pro, Enterprise, or Education computers, you can use the Local Group Policy Editor to disable the chatbot. If your device uses Windows 10 Home, you must use the Registry. However, you can use the Registry method for any edition of the operating system. Also, during the initial rollout of the chatbot, Microsoft won’t enable Copilot on managed devices running the Pro edition, Enterprise edition, or Education editions.
It’s important to note that starting with the rollout of the update KB5040427, Microsoft is changing the experience and making Copilot a regular app that you can resize and move around the desktop, which also means you can uninstall from the Settings app.
In this
guide
, I’ll teach you the different ways to get rid of Copilot on Windows 10.
-
Uninstall Copilot from Windows 10 after July 2024 update
-
Disable Copilot from Windows 10 before July 2024 update
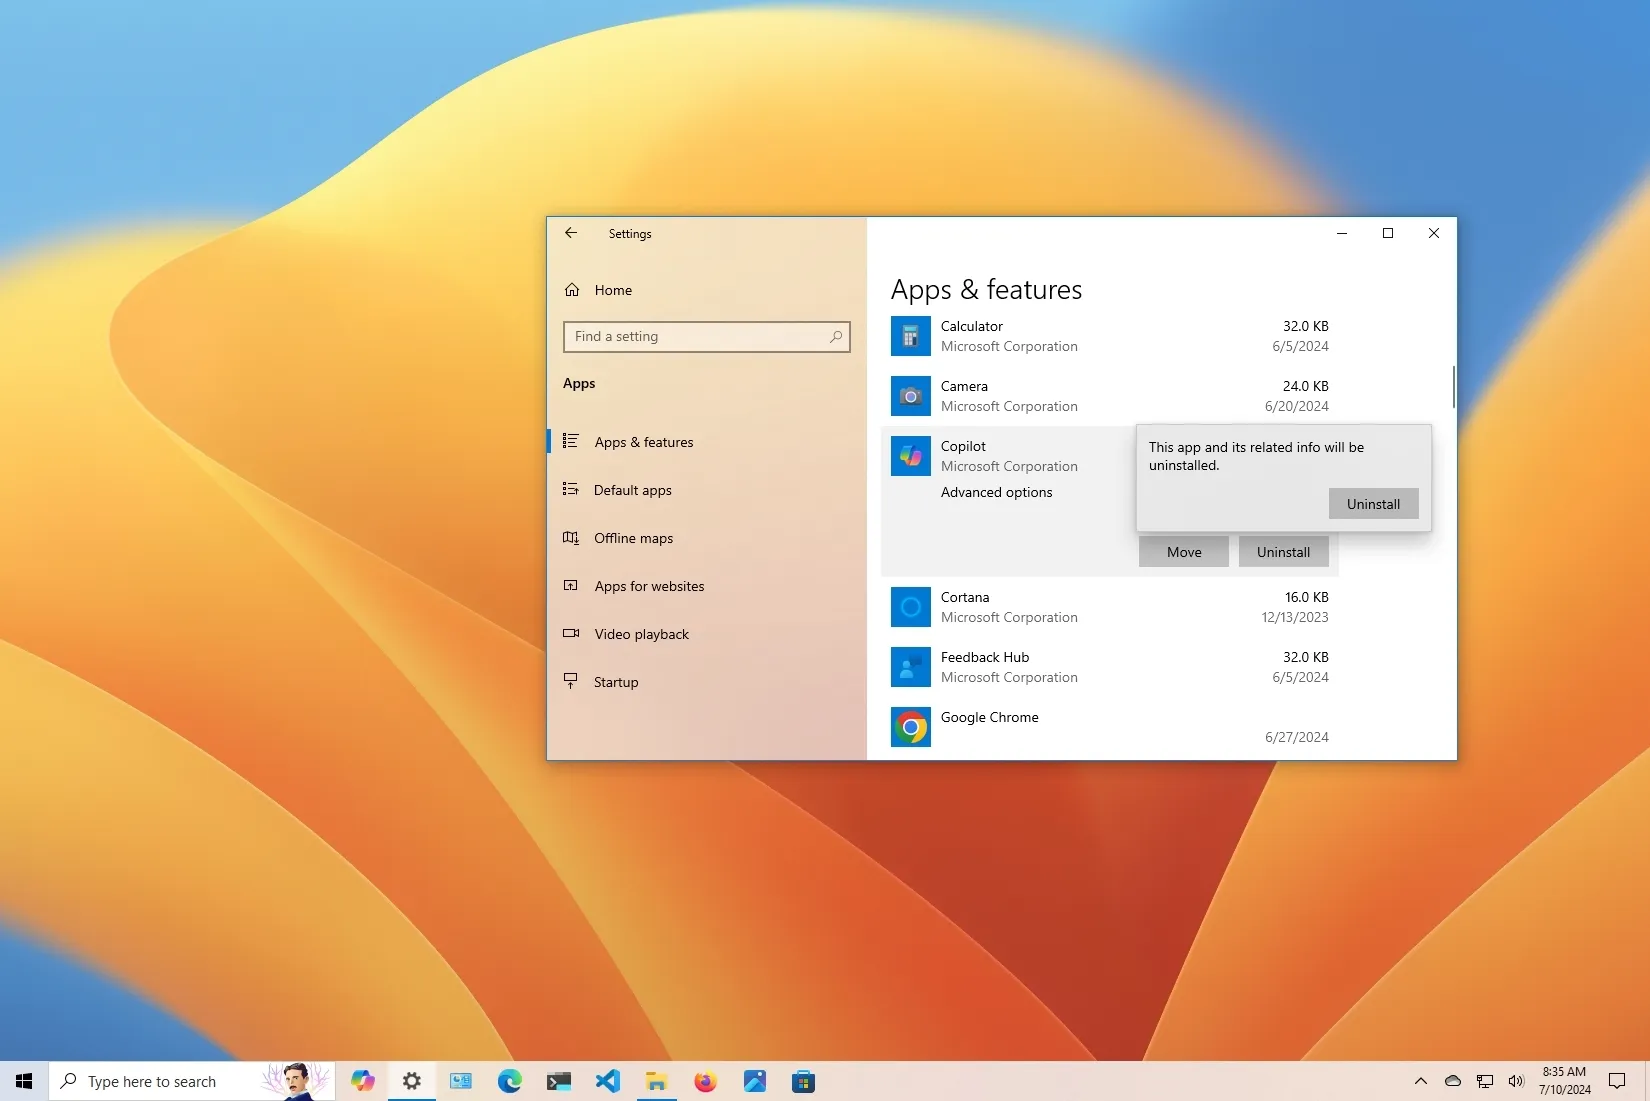
Uninstall Copilot from Windows 10 after July 2024 update
Starting with the
July 2024 update
, Windows 10 is changing the Copilot integration, and it’s making it a web app that you can easily remove from the Settings app.
To uninstall the Copilot app on Windows 10, use these steps:
Open
Settings
.
Click on
Apps
.
Click on
Apps & features
.
Select the
Copilot
app.
Click the
Uninstall
button.

Click the
Uninstall
button again to confirm.
Once you complete the steps, the Copilot app will be removed from the Taskbar and the system.
Disable Copilot from Windows 10 before July 2024 update
If you haven’t installed the July 2024 update or higher release or the Copilot button still appears in the System Tray, you can try one of these methods to disable the experience on your computer.
Method 1: Disable Copilot from Taskbar
To remove the Copilot button from the Taskbar’s System Tray, use these steps:
Right-click the
Taskbar
.
Click the
“Show Copilot (preview) button”
option to clear the setting and disable the feature.

Once you complete the steps, the Copilot button will be removed from the Taskbar, but you can still use the
“Windows key + C”
keyboard shortcut to open and close the experience.
Method 2: Disable Copilot from Group Policy
To disable Windows 10 Copilot from Group Policy, use these steps:
Open
Start
.
Search for
gpedit
and click the top result to open the
Group Policy Editor
.
Open the following path:
Double-click the
“Turn off Windows Copilot”
policy.

Select the
Enabled
option to disable Copilot on Windows 11.

Click the
Apply
button.
Click the
OK
button.
Restart the computer.
After you complete the steps, Copilot will be disabled from the operating system, and you won’t even be able to open the interface with the
“Windows key + C”
keyboard shortcut. This action will remove the
“Show Copilot (preview) button”
option from the Taskbar context menu.
If you want to re-enable the feature, use the same instructions, but in
step 4
, choose the
“Not Configured”
option.
Method 3: Disable Copilot from Registry
To remove Windows 10 Copilot from the Registry, use these steps:
Open
Start
.
Search regedit and click the top result to open the Registry Editor.
Open the following path:
Right-click the
Windows
key, select
New
, and choose the
Key
option.

Name the
WindowsCopilot
and press
Enter
.
Right-click the “WindowsCopilot” key, select
New
, and choose the
“DWORD (32-bit) Value”
option.
Double-click the
TurnOffWindowsCopilot
DWORD and change its value from
0
to
1
to disable Copilot through the Registry.

Click the
OK
button.
Restart the computer.
Once you complete the steps, the chatbot AI will be disabled completely on Windows 11, similar to using the Group Policy Editor method mentioned above.
It’s possible to revert the settings using the same steps, but in
step 3
, set the
“TurnOffWindowsCopilot”
value to
“0”
(zero).
Update July 10, 2024:
This guide has been updated to ensure accuracy and reflect changes to the process.