- Microsoft adds support to create 7z and TAR archive files in addition to Zip on Windows 11.
- The wizard offers the ability to choose compression methods and levels for each archival format.
- The support is available starting with version 24H2 (2024 Update).
UPDATED 7/9/2024:
On
Windows 11 24H2
and higher releases, you can create TAR, 7z, and Zip archival format files using a new wizard available on File Explorer, and in this guide, I’ll explain how to complete this process.
The ability to create and extract Zip files has been available in the operating system for a long time, and then native support for
extracting Zip, RAR, TAR, and 7zip (7z)
arrived with version 23H2, and starting with the release of Windows 11 24H2, it’s also possible to create TAR and 7z archival formats.
This is possible through the integration of the
“libarchive”
open-source project into the operating system, which works in combination with the new wizard interface available through File Explorer. The compression wizard lets you choose the archival format, compression method, compression level, and some additional settings.
Although you can even choose the compression method and level to create Zip files, it’s still not possible to work with passwords and encryption for extraction or creation of archival formats. If you have to use these features, you will still have to use third-party tools like 7-Zip.
In this
guide
, I will outline the steps to create archival format files for each of the supported formats, including TAR, 7zip, and Zip.
-
Create TAR archival format on Windows 11
-
Create 7z archival format on Windows 11
-
Create Zip archival format on Windows 11
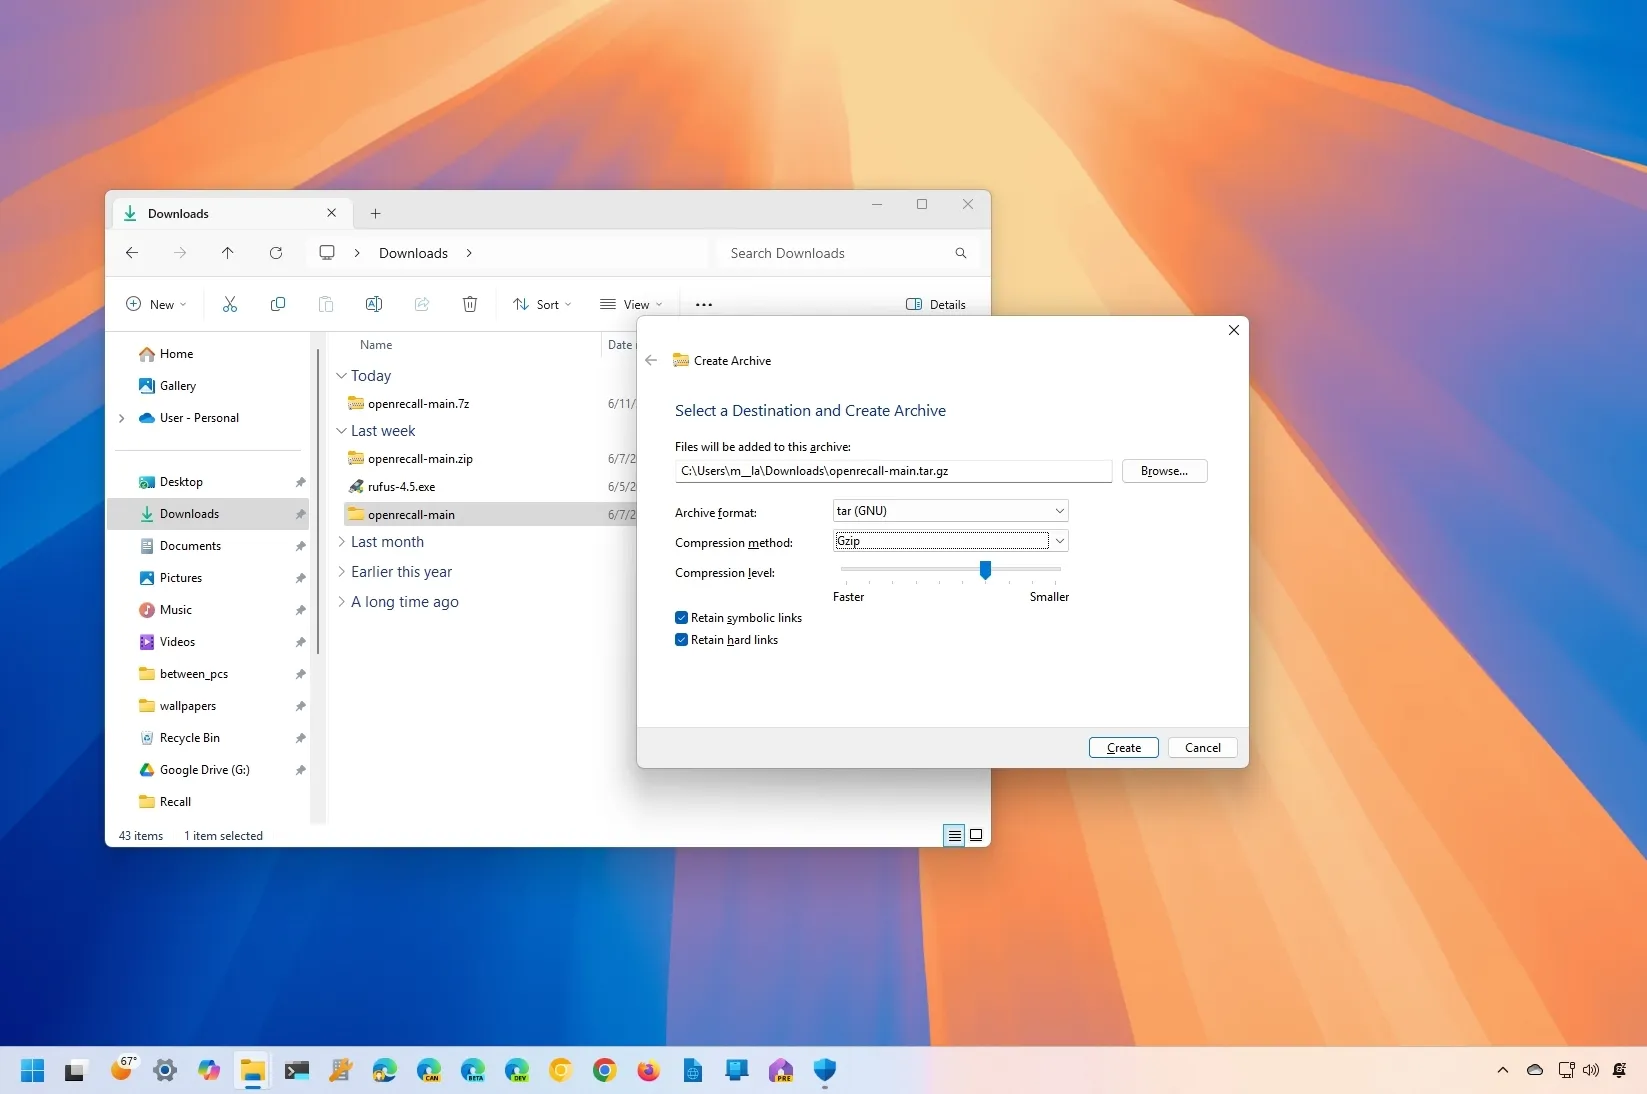
Create TAR archival format on Windows 11
To create a TAR file on Windows 11, use these steps:
Open
File Explorer
on Windows 11.
Open the folder location with the files and folders to compress.
Right-click the file or folder, select
“Compress to,”
and click
“Additional options.”

(Optional) Click the
Browse
button to select where the archive can be stored.
Choose the
“tar (GNU)”
option from the “Archive format” setting.

Select the compression method, including
BZip2
,
Gzip
,
xz
,
or
Zstandard
.
Choose the compression level.
(Optional) Check the
“Retain symbolic links”
option to preserve the element pointer to another file or directory in a file system.
(Optional) Check the
“Retain hard links”
option always to point a filename to data on a storage device.
Click the
Create
button.
Once you complete the steps, the TAR archival format file will be created according to the compression settings.
Since the operating system comes with native support for many archival formats, you can also use File Explorer to open and extract the TAR file.
If you want to use the default compression method and level, right-click the file or folder, select
“Compress to,”
and choose the
“TAR File”
option.
Create 7z archival format on Windows 11
To create a 7zip file on Windows 11, use these steps:
Open
File Explorer
.
Open the folder location with the files and folders to compress.
Right-click the file or folder, select
“Compress to,”
and click
“Additional options.”
(Optional) Click the
Browse
button to select where the archive can be stored.
Choose the
“7zip”
option from the “Archive format” setting.

Select the compression method for
the 7z file
, including
Store, Deflare, BZip2, LZMA1, LZMA2 (default),
or
PPMd.
Choose the compression level.
(Optional) Check the
“Retain symbolic links”
option to preserve the element pointer to another file or directory in a file system.
Click the
Create
button.
After you complete the steps, the 7z file format will be created on the computer.
Since the operating system has native support for many archival formats, you can also use File Explorer to open and extract the 7z file.
If you want to use the default compression method and level, right-click the file or folder, select
“Compress to,”
and choose the
“7z File”
option.
Create Zip archival format on Windows 11
To create a Zip file on Windows 11, use these steps:
Open
File Explorer
.
Open the folder location with the files and folders to compress.
Right-click the file or folder, select
“Compress to,”
and click “Additional options.”
(Optional) Click the
Browse
button to select where the archive can be stored.
Choose the
“Zip”
option from the “Archive format” setting.

Select the compression method, including
Store
or
Deflare
.
Choose the compression level.
(Optional) Check the
“Retain symbolic links”
option to preserve the element pointer to another file or directory in a file system.
Click the
Create
button.
Once you complete the steps, the Zip file will be created with the compression settings you specified.
You can always open the Zip file using File Explore like it was possible in the past.
If you want to use the default compression method and level, right-click the file or folder, select
“Compress to,”
and choose the
“Zip File”
option.
Other details
Creation support includes
Zip, TAR, and 7-Zip
archival formats with options to choose custom compression methods and levels. However, you cannot work with passwords or encryptions.
Although you have been able to create Zip files for a long time, it’s not until version 24H2 that you can also choose the compression method and level for Zip.
Open and extract support includes
Zip, TAR, 7-Zip, and RAR
archival formats as long as they’re not encrypted. Some of the formats you can open and extract include
“.tar,” .tar.gz,” “.tar.bz2,” “.tar.zst,” “.tar.xz,” “.tgz,” .tbz2,” “.tzst,” .txz,” .rar,”
and
“.7z”
.
While you have been able to use the Compress-Archive command tool to
create Zip files with PowerShell
and the native
“tar.exe”
tool to create “tar” files with Command Prompt or PowerShell, Windows 11 doesn’t include a specific command tool to create the different archival formats or another tool to create “7z” files.