-
To change the DNS address on Windows 11, open
Settings
>
Network &
Internet
and select
“Ethernet”
or
“Wi-Fi.”
Then, open the
“DNS server assignment”
settings
and change the DNS address. -
Also, on
Command Prompt (admin)
, you can use the
“netsh interface ip set dns name=”Ethernet0″ static 1.1.1.1”
command to change the DNS servers, and on
PowerShell (admin)
, you can use the
“Set-DnsClientServerAddress -InterfaceIndex 12 -ServerAddresses 208.67.222.222”
command.
UPDATED 7/16/2024:
On
Windows 11
(or any other computing system), Domain Name System (DNS) is a core technology of the internet and networks across the planet that translates domain names (X.com) into IP addresses (104.244.42.193) that computers can understand. Otherwise, it would be too difficult for us to remember a bunch of numbers for each website we want to visit or the device we have to connect.
Typically, your Internet Service Provider (ISP) supplies this configuration automatically to make connecting to your favorite websites and services easier. However, many other DNS resolvers on the internet are faster, more reliable, better in privacy, and more secure. Some of them include
Cloudflare
,
, and
Cisco
.
If the current DNS servers are slow and unreliable and you want to boost your internet experience or you have privacy concerns about your ISP, you can change the DNS addresses on Windows 11 in at least four ways using the Settings app, Command Prompt, PowerShell, and Control Panel.
In this
guide
, I’ll teach you how to change the DNS servers on Windows 11. You can follow these instructions if you want to
set a new DNS server address along with a static IP configuration
.
-
Best DNS servers for Windows 11
-
Change DNS servers on Windows 11 from Settings
-
Change DNS servers on Windows 11 from Command Prompt
-
Change DNS servers on Windows 11 from PowerShell
-
Change DNS servers on Windows 11 from Control Panel
Best DNS servers for Windows 11
Cloudflare, OpenDNS, and Google are among the best companies that offer fast, reliable, and secure resolvers. However, you can always use any service you want.
Cloudflare DNS addresses
- 1.1.1.1
- 1.0.0.1
Google Public DNS addresses
- 8.8.8.8
- 8.8.4.4
OpenDNS by Cisco DNS addresses
- 208.67.222.222
- 208.67.220.220
I have been using Google DNS addresses for a long time, and they have been fast and reliable. Also, to ensure you get the best experience, you could set the primary DNS address of one service and then the primary address of another service. If one of the services is down, you will still have connectivity with the secondary address.
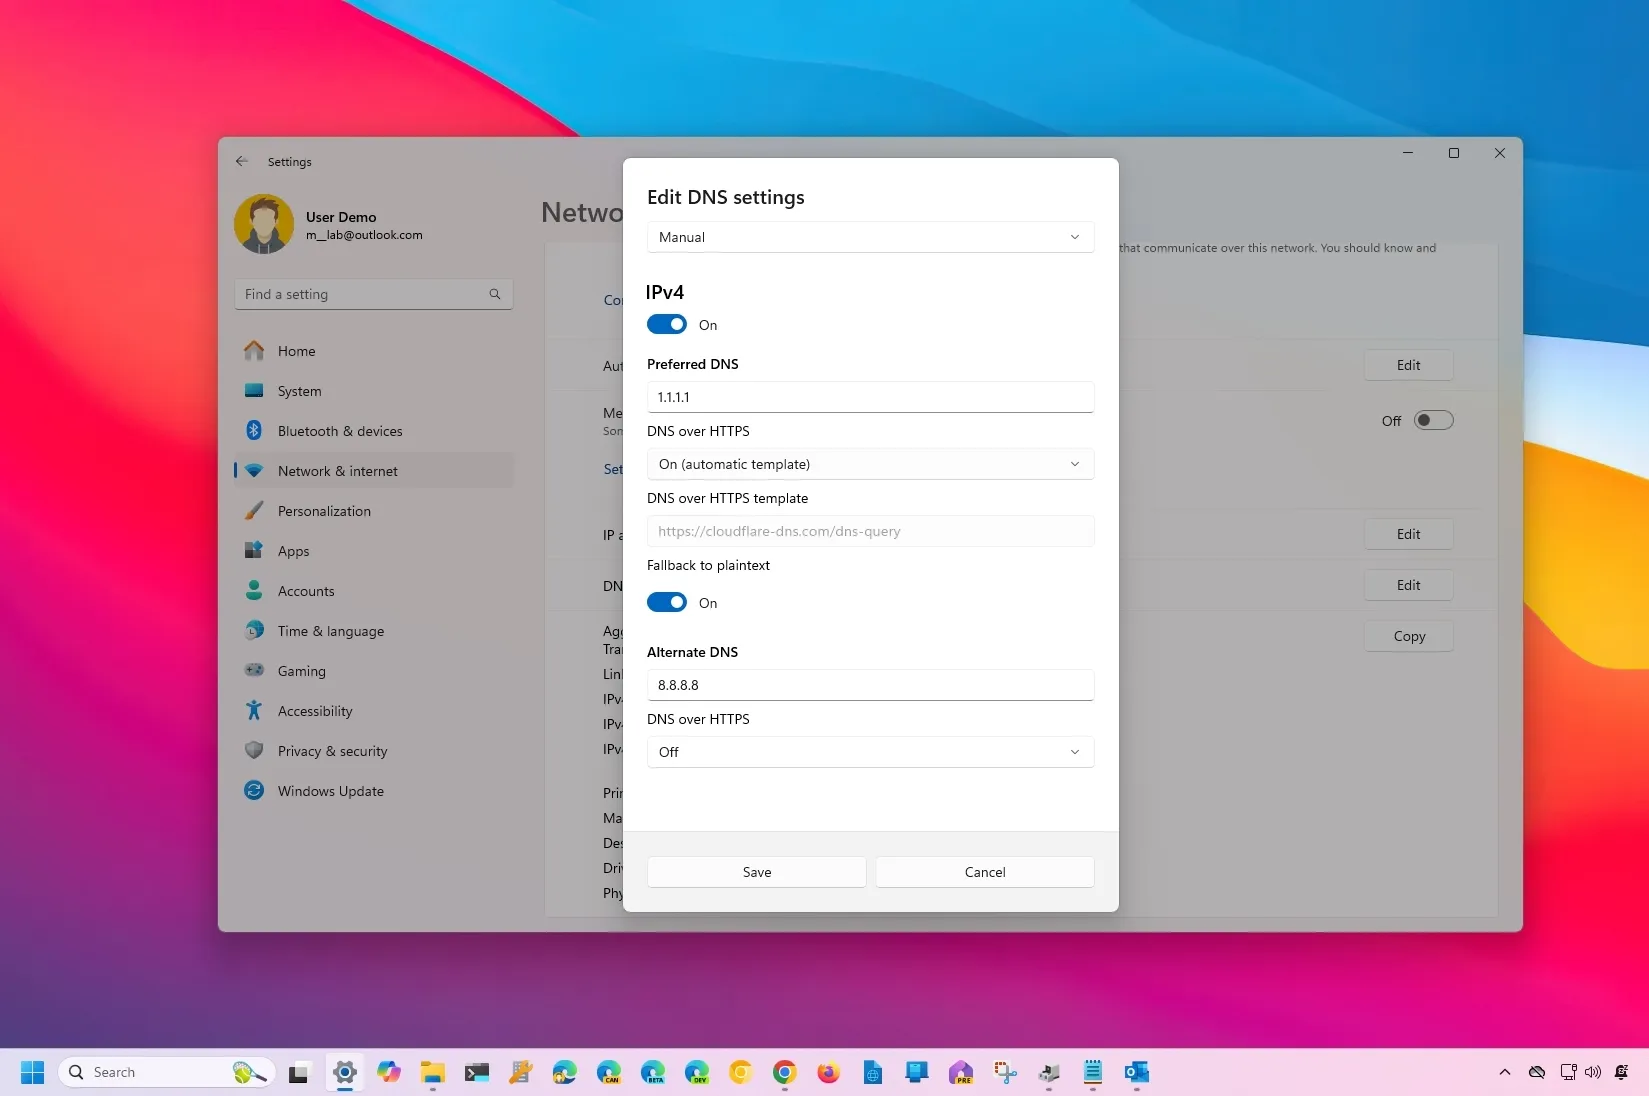
Change DNS servers on Windows 11 from Settings
If typing commands isn’t your thing, the Settings app is the best method for changing the DNS servers. You can also easily configure DNS over HTTPS (DoH), which offers more privacy and security by encrypting your computer’s inbound and outbound DNS traffic.
To change the Windows 11 DNS address from Settings, use these steps:
Open
Settings
on Windows 11.
Click on
Network & Internet
.
Click the
Ethernet
tab.
Click the
Edit
button under the “DNS server assignment” section.

Select the
Manual
option using the drop-down menu.
Turn on the
IPv4
toggle switch.
Confirm the DNS server IP address for
Cloudflare
,
Google
,
OpenDNS
, or another service under the “Preferred DNS” section.

(Optional) Select the
“On (automatic template)”
option to
enable DNS encryption
under the “Preferred DNS encryption” section.
(Optional) Turn on the
“Fallback to plaintext”
toggle switch to send DNS requests unencrypted over plain text if DoH fails.
Confirm the IP address of the secondary DNS address under the “Alternate DNS” section.
(Optional) Select the
“On (automatic template)”
option to enable encryption for the secondary server under the “Alternative DNS encryption” section.
(Optional) Turn on the
“Fallback to plaintext”
toggle switch.
Click the
Save
button.
Once you complete the steps, the computer will continue to use a dynamic network address configuration, but it’ll now use the static DNS servers you specified.
If you want to undo the changes, you can use the same steps outlined above, but in
step 5
, choose the
“Automatic”
option and click the
“Save”
button.
Change DNS servers on Windows 11 from Command Prompt
The quickest way to change the DNS servers on Windows 11 is using Command Prompt, even though typing commands isn’t for everyone.
To change the DNS address with Command Prompt, use these steps:
Open
Start
.
Search for
Command Prompt
, right-click the top result, and select the
Run as administrator
option.
Type the following command to view the current networking configuration and press
Enter
:
Under the network adapter section, confirm the adapter’s name and
“IPv4”
and
“DNS Servers”
addresses.

Type the following command to set the new DNS server address on Windows 11 and press
Enter
:
In the command, change
“Ethernet0”
to the name of your adapter and
“1.1.1.1”
to the DNS server address for the service to use. You can also specify the address for the local DNS server (if applicable).
Type the following command to set an alternate DNS server address and press
Enter
:
In the command, change
“Ethernet0”
with the name of your adapter and
“1.0.0.1”
with the preferred alternate DNS server address.

Once you complete the steps, you can use the
ipconfig /all
command to confirm the new configuration.
If you no longer have to use the custom addresses, you can remove the configuration to receive dynamic DNS IP addresses from the DHCP server by running the
netsh interface IP set DNS "ADAPTER-NAME" DHCP
command. In the command, change the
“ADAPTER-NAME”
for the name of your network adapter.
Change DNS servers on Windows 11 from PowerShell
You can also use the
NetTCPIP
module with PowerShell to manage the DNS server settings on Windows 11.
To change the DNS address from PowerShell on Windows 11, use these steps:
Open
Start
.
Search for
PowerShell
, right-click the result, and select the
Run as administrator
option.
Type the following command to view your current network configuration and press
Enter
:
Confirm the values for the
“InterfaceIndex”
and
“DNSServer”
in the command output.

Type the following command to assign a primary DNS server address and press
Enter
:

(Optional) If you need to set a secondary DNS server address, you can use the same command but add a comma and append the second address:
In the command, change the
“InterfaceIndex”
number to the one corresponding to your network adapter, and change
“ServerAddresses”
to the DNS address.
After you complete the steps, you can use these instructions to
check if network traffic is using the DNS resolver
you have configured.
If you no longer have to use the custom addresses, you can restore the IP addresses from the DHCP server by running the
Get-NetAdapter "ADAPTER-NAME" | Set-DnsClientServerAddress -ResetServerAddresses
command. In the command, change the
“ADAPTER-NAME”
for the name of your network adapter.
Change DNS servers on Windows 11 from Control Panel
Alternatively, it’s still possible to use the Control Panel to change the DNS settings on Windows 11.
To change the DNS address of Windows 11 from the legacy Control Panel, use these steps:
Open
Control Panel
.
Click on
Network and Internet
.
Click on
Network and Sharing Center
.
Click the
“Change adapter settings”
option from the left pane.

Right-click the network adapter and select the
Properties
option.
Select the
“Internet Protocol Version 4 (TCP/IPv4)”
option.
Click the
Properties
button.

Choose the
“Use the following DNS server addresses”
option to enable a DNS manual configuration.
Confirm the
“Preferred DNS server,”
which is the server address of
Cloudflare
,
Google
,
OpenDNS
, or another service.

(Optional) Specify the
“Alternative DNS server”
and the DNS address your device will use if it can’t reach the preferred server address.
Click the
OK
button.
Click the
Close
button.
Once you complete the steps, you can confirm the new configuration using services like the
DNS leak test
.
You can always restore the DHCP configuration for the DNS addresses using the same steps, but in
step 8
, choose the
“Obtain DNS server address automatically”
option and click the
“OK”
button.
You can specify any DNS server on Windows 11 using the Control Panel, but you won’t be able to turn on the “DNS over HTTPS” feature. You can only do this from the Settings app. It’s possible to enable DoH through Command Prompt, but it’s not a supported option.
Whatever method you use, make sure to use the correct IP address for the DNS server. Otherwise, you won’t be able to connect to the internet. Also, it shouldn’t be necessary, but I have experienced in the past that a restart may be needed for the system to apply the settings.
It’s important to note that you can change the DNS server addresses on Windows 11. However, the best approach is configuring the DHCP server (usually the router) to deploy these addresses to all the local network computers automatically. You should only proceed with this configuration on your computer when you don’t have control over the network or have a specific network requirement to use a different address.
Update July 16, 2024:
This guide has been updated to ensure accuracy and reflect changes to the process.