-
To change the user folder name on Windows 11, you have to create a new local administrator account using the name as you want the user folder to appear from the
Other users
settings, transfer your files and settings from the old to the new account, delete the old account, and link your new account with your Microsoft account. -
Alternatively, you can also rename the user folder through the Registry by updating the
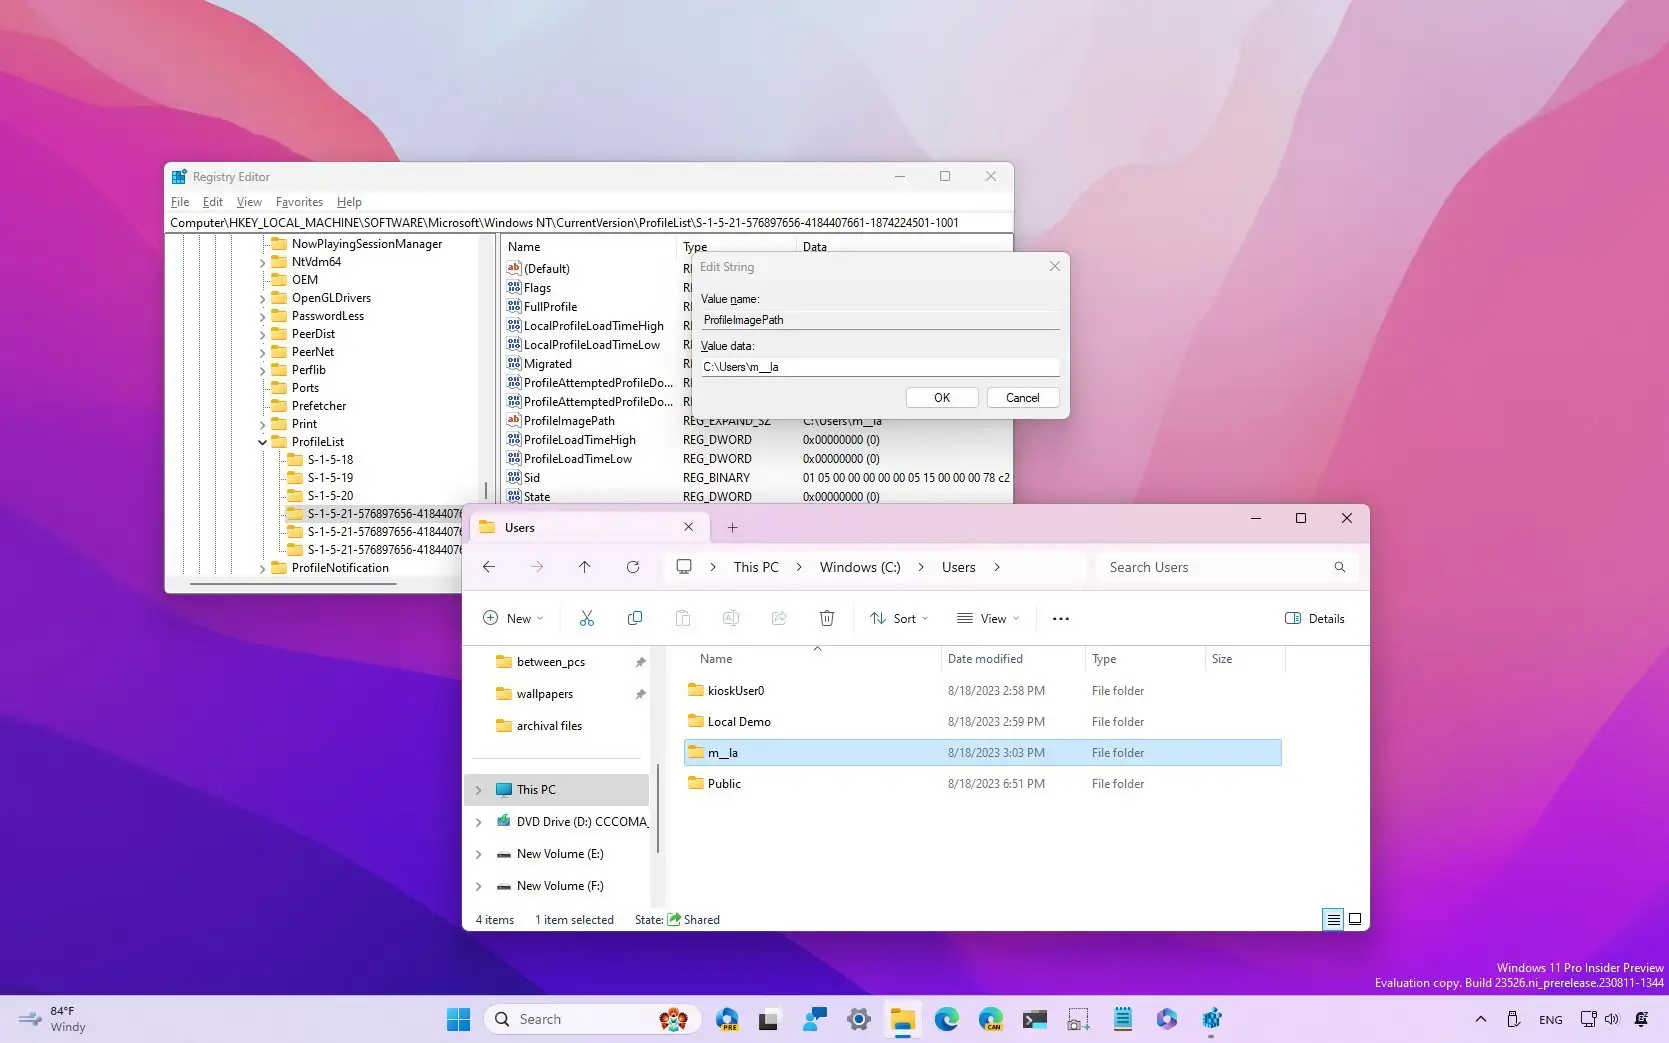
ProfileImagePath
string with the new name and then changing the account folder name from the
Users
folder. If you want to use this option, you ll have to use a secondary administrator account.
UPDATED 5/19/2024: On Windows 11, the system uses a portion of the account name to construct a folder to store the user’s data when you establish an account. When using Windows 11, the folder name for the account is irrelevant because the system assigns it automatically, but not everyone will like it.
There are at least two methods in Windows 11 to modify the name of the user profile folder if you need to for some reason. You can move your data to the new profile and make a new local account with the folder name you choose. Altering the settings and renaming the profile folder can also be done via the Registry, though this is not advised.
This tutorial will show you how to modify the name of the user profile folder in Windows 11.
-
Change folder profile name on Windows 11
-
Change folder profile name with Registry on Windows 11
Change folder profile name on Windows 11
In Windows 11, follow these procedures to change the name of the user profile folder:
OpenSettings on Windows 11.
Select “Accounts.”
Select the “Other users” page.
Select the “Add account” option.

Select the option that reads, “I don’t have this person’s sign-in information.”

Select the option to “Add a user without a Microsoft account.”

Verify the account’s name. (This will be the new folder name you choose.)

(Selective) Don’t bother making a password.
Press the “Next” button.
Click the “Change account” option after selecting the recently created local account.

In the Account type setting, select the Administrator option.

Press the “OK” button.
Exit the account.
Open the new account and log in.
You will get an account with a new folder name after you finish the tasks.
Moving your files to the new account is the final step. Using File Explorer, users can accomplish this. If necessary, you might also need to adjust a few settings in the new account.
You want to link your Microsoft account to the new account and delete the old one after moving your files.
Delete old account
Follow these instructions to remove an account on Windows 11:
Open the settings.
Select “Accounts.”
Select the “Other users” page.
Click the “Remove” option after selecting the previously created local account.

Press the option labeled “Delete account and data.”
You can link the old account to the new one using the same Microsoft account after the procedures are finished.
Link your Microsoft account
In Windows 11, follow these procedures to change the local account to a Microsoft account:
Open the settings.
Select “Accounts.”
Click on “Your Infopage.”
Click the “Sign in with a Microsoft account” option under the “Account settings” section.

Verify your Microsoft account information.
Once the procedures are finished, you can use the correct folder name to access your account.
Change profile name with Registry on Windows 11
You may also be possible to modify the name of the profile folder using the Registry, which will save you from having to create a new account, move your data, and make other changes.This is not advised, though, as you can encounter undesirable behaviors.
Follow these procedures to modify the name of the user profile folder in Windows 11’s Registry:
LaunchStart.
Look up “Command Prompt,” then right-click on the first result and choose “Run as administrator.”
To activate the built-in Administrator account, type the following command and hit Enter:

To modify the folder name, log out of the account.
Use the recently activated built-in Administrator account to log in; a password is not required.
LaunchStart.
To launch the application, search for Command Prompt and select the top result.
To modify the name of the profile folder, type the following command to find the account’s Security Identifier (SID) and hit Enter:

LaunchStart.
To access the Registry, search for “regedit” and select the top result.
Look through the path below:
To modify the folder name, select the key that displays the account’s SID.
Choose the Modify option by right-clicking the ProfileImagePathand.
Modify the user profile folder’s name without changing the path.

Press the “OK” button.
Press the Windows key + E to launch File Explorer.
Navigate to the path below:
Choose the Rename option by right-clicking the folder profile.
Verify that the folder name is precisely what you entered in the Registry key, then hit Enter.

On the “Continue” button, click.
Exit the integrated Administrator account.
Access the updated account by logging in.
LaunchStart.
Look up “Command Prompt,” then right-click on the first result and choose “Run as administrator.”
To deactivate the built-in Administrator account, use the following command and hit Enter:
The account will appear in the new folder name once the processes are finished. Applications may need to have their settings updated with the new path if they point to the profile folder.
Update May 19, 2024: To guarantee accuracy and take into account modifications to the procedure, this guide has been revised.