-
To debloat Windows 11, download and launch
” Win11Debloat,”
extract the files, choose the bloatware to remove using the
“Applist.txt”
file, and run the script. - You can also use other tools like Win Debloat Tools and JunkCtrl, and you can even use a workaround to install Windows 11 without bloatware from the beginning.
The term
“debloat”
refers to the process of removing those unnecessary apps and services from
Windows 11
(in this case) that you may not find necessary, invasive, or otherwise would be wasting system resources.
Unfortunately, even if you go through the default
clean installation
process, Windows 11 still comes with software and services that may continuously run in the background, wasting system resources and battery life and collecting usage data (telemetry) without an option to turn them off.
Although you could spend hours trying to figure out the things you can remove and more time using PowerShell commands, tools like
“Win11Debloat,” “Win Debloat Tools,”
and
“JunkCtrl”
make it easy to debloat Windows 11 quickly.
In this
guide
, you will learn the steps to use a simple to make Windows 11 as lean as possible by removing components you may not need.
-
Debloat Windows 11 with Win11Debloat
-
Debloat Windows 11 with Win Debloat Tools
-
Debloat Windows 11 with JunkCtrl (deprecated)
-
Debloat Windows 11 with install workaround
Debloat Windows 11 with Win11Debloat
The
Win11Debloat script
uses PowerShell to debloat your setup automatically. The script removes virtually every unnecessary app from Windows 11.
To debloat Windows 11 through the Win11Debloat script, use these steps:
Open the
Win11Debloat
GitHub page
.
Click the
Code
menu and choose the
Download Zip
option.

Extract the contents of the
“.zip”
file
.
Open the
Win11Debloat-master
folder.
Right-click the
Applist.txt
and choose the
“Edit in Notepad”
option.

Review the apps that will be removed.
(Optional) Add a
#
character in front of the specific app in the list below to prevent it from being removed.

Click on
File
and choose the
Save
option.
Right-click the
Run.bat
file and choose the
Run as administrator
option.

Click on
More options
.
Click the
Run anyway
option.

Click the
Yes
button.
Press
“1”
to choose the
Default mode
since you already edited the
Applist
file.

Confirm the bloatware that will be removed from Windows 11.
Press any key to continue.
After completing the steps, the script will debloat Windows 11 and remove unnecessary features from the computer for a more declutter experience.
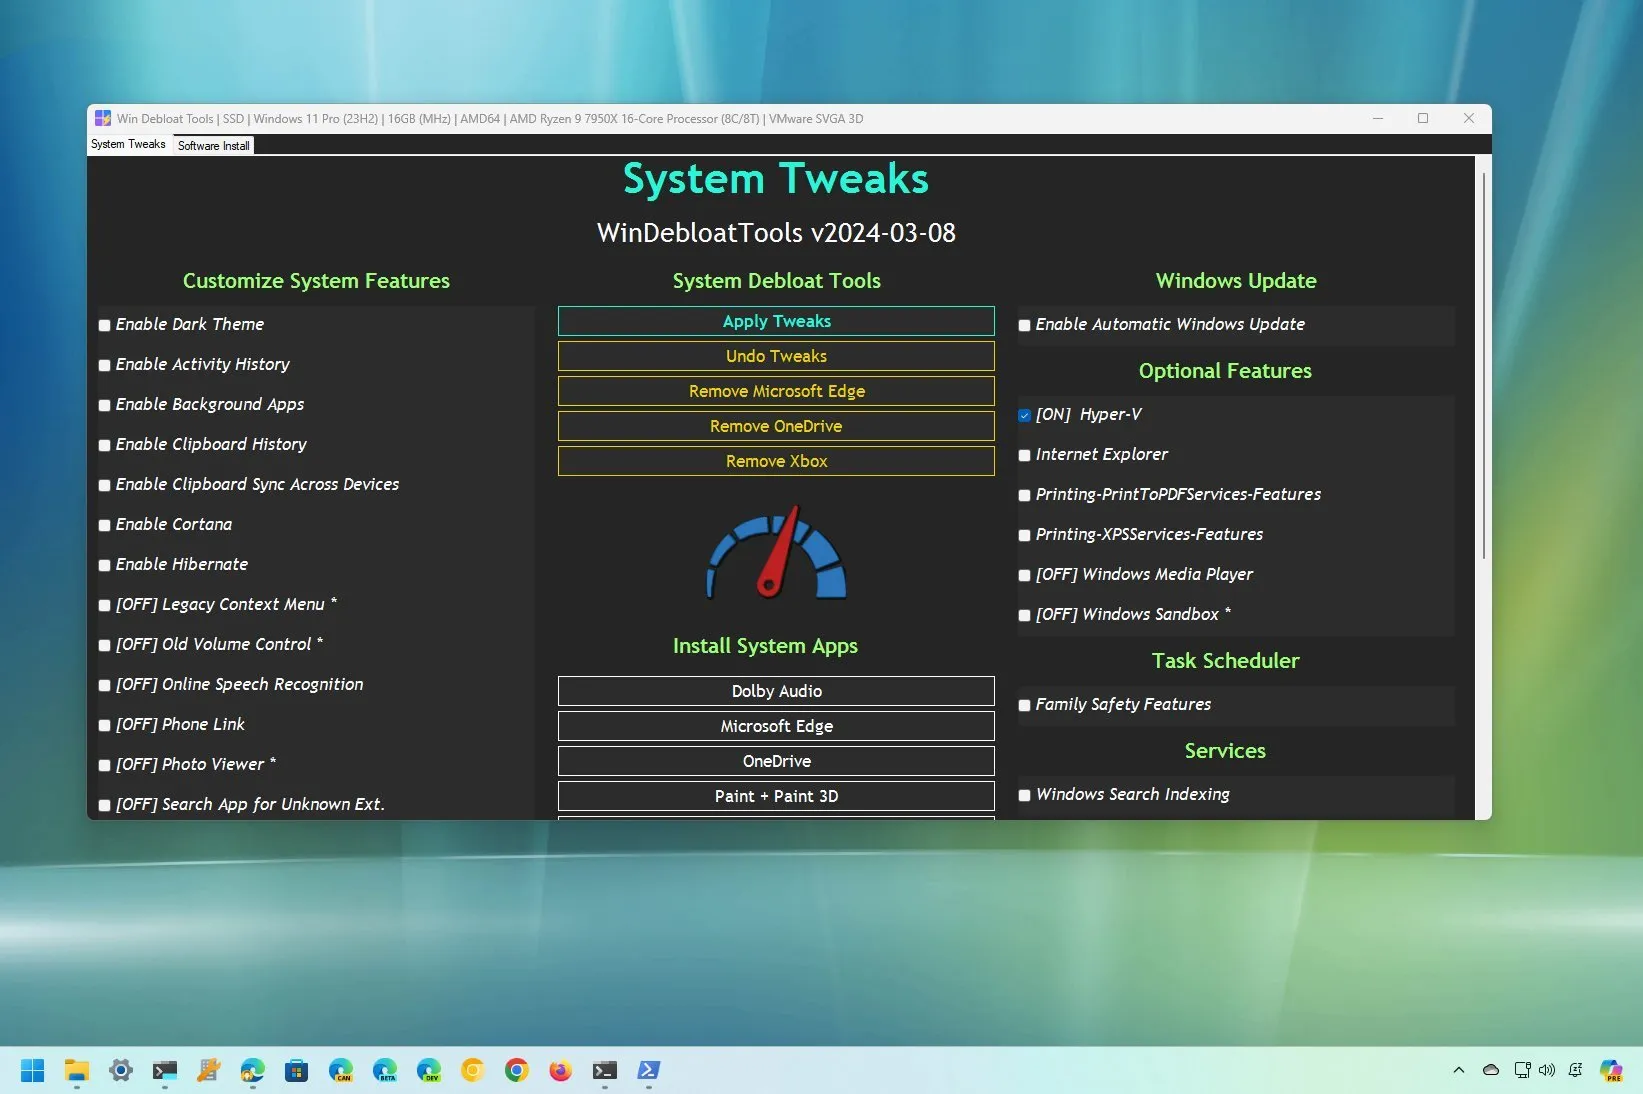
Debloat Windows 11 with Win Debloat Tools
In addition, you can also use the “Win Debloat Tools” project, which is a collection of scripts that automates the process of removing virtually all the apps and features that are unnecessary to run Windows 11.
Run Win Debloat Tools automatically
To use the Win Debloat Tools on Windows 11, use these steps:
Open
Win Debloat Tools
GitHub website
.
Click the
Main
download option under the “Download Latest Version” section.

Open the downloaded file.
Click the
Extract all
button from the command bar.

Click the
Extract
button.
Open the uncompressed
Win-Debloat-Tools-main
folder.
Right-click the
OpenTerminalHere.cmd
file and choose the
Run as administrator
option.
Copy and paste the following command to debloat Windows 11 completely (with the default selections) and press
Enter
:

Click the
OK
button.
Click the
Yes
button to restart the computer.
Once you complete these steps, the tool will run the scripts automatically to disable and remove unnecessary apps and features. It’ll also enable and install some recommended apps and features. For example, this tool will install all the versions of .NET, enable show extensions on File Explorer, configure a more efficient power plan, run some teaks for gaming, and a lot more. (This is the
list of the scripts
available with this tool.)
Run Win Debloat Tools manually
You can also run the tool manually to remove only specific apps, features, and services you don’t want on Windows 11. Here’s how:
Open
Win Debloat Tools
GitHub website
.
Click the
Main
download option under the “Download Latest Version” section.
Open the downloaded file.
Click the
Extract all
button from the command bar.
Click the
Extract
button.
Open the uncompressed
Win-Debloat-Tools-main
folder.
Right-click the
OpenTerminalHere.cmd
file and choose the
Run as administrator
option.
Copy and paste the following command to start the program and press
Enter
:
Click the
System Tweaks
tab.
Check and uncheck to mark the apps or features as “Off” to remove them.
Click the
Apply Tweaks
button to debloat Windows 11.

(Optional) Click the
“Remove Microsoft Edge”
button to uninstall the browser.
Click the
Software Install
tab.
Click the
“Uninstall Mode”
button to mark it as “On” to enable the uninstall process.
Choose the applications and features to remove from Windows 11.
Click the
“Uninstall Selected”
button.

After you complete the steps, the Win Debloat Tools will remove the features and apps from Windows 11.
When checking or unchecking the items, you may notice a delay, so just be patient.
Debloat Windows 11 with JunkCtrl (deprecated)
The developer seems to have abandoned the project, and the app is no longer available for download, but I have updated this guide with an alternate download link. However, since this project has been abandoned, the script won’t be updated to remove future bloatware (if any).
To remove all the bloatware apps from a Windows 11 installation, use these steps:
Open
Junkctrl
alternative download page
.
Under the “Assets” section, click the
Junkctrl.zip
option to save the file.
Open the downloaded file.
Click the
Extract all
button from the command bar.
Click the
Extract
button.
Open the uncompressed
Junkctrl
folder.
Double-click the
Junkctrl.exe
files to launch the application.
Click the
More info
option and the
Run anyway
button (if applicable).
Click the
“Skip and use Copilot”
option.

(Optional) Hold the
“Ctrl”
key and select each app you want to remove.
Click the
Move
button.
(Optional) Click the
Move all
button to debloat all the apps from Windows 11.
(Optional) Click the
“Show system apps”
option to show system apps, including apps you usually can’t uninstall from Windows 11, such as Widgets, Your Phone, Xbox, etc.
(Optional) Hold the
“Ctrl”
button and select each app you want to remove.
Click the
Move
button.

Click the
Uninstall
button.
Once you complete the steps, the tool will run the necessary scripts to remove the selected apps and services to debloat the system.
Some of the apps you may consider removing include TikTok, Instagram, Office Hub, Solitare Collection, Mixed Reality Portal, People, Print 3D, Get Started, and Media Player. You could also remove the OneDrive app, Weather, News, Dev Home, Camera, Maps, Your Phone, Xbox apps, Microsoft Teams, Outlook, Remote Desktop, Microsoft Store, Clipchamp, and others. However, the apps you want to remove to debloat Windows 11 will depend on the apps you need to get the work done on your computer.
In my test, the tool worked well, but I was not able to
remove many components like Microsoft Edge
as they are essential, and removing them will break other features that depend on those components. Also, at the time of writing, the “Copilot” feature is not listed as a component you can remove with this app, but I have written another dedicated
set of instructions to disable it
.
The tool was initially known as “ThisIsWin11” (TIW11), then the name changed to “LoveWindowsAgain,” then it changed to “Debloos,” and now, due to some conflicts with the Microsoft Store, it’s been renamed to “JunkCtrl.” This guide has been updated to reflect the latest name and the new process.
Debloat Windows 11 with install workaround
Alternatively, you can
install Windows 11 without any bloatware
in the first place, which is possible by selecting a specific region setting during the installation setup. Here’s how:
Start the PC with the
Windows 11 USB flash drive
.
Press any key to continue.
Choose the
“English (World)”
or
“English (Europe)”
option from the “Time and Currency format” setting.

Click the
Next
button.
Click the
Install now
button.

Click the “
I don’t have a product key”
option if you are doing a reinstallation. If Windows 11 was previously activated after the installation, reactivation would happen automatically.

Select the edition of the operating system your license key activates (if applicable).
Check the
“I accept the license terms”
option.
Click the
Next
button.
Select the
“Custom: Install Windows only (advanced)”
option.

Select each partition in the hard drive you want to install Windows 11 and click the
Delete
button. (Typically, the “Drive 0” is the drive that contains all the installation files.)

Select the hard drive (Drive 0 Unallocated Space) to install Windows 11.

Click the
Next
button.
Select the hard drive
(“Drive 0 Unallocated Space”)
to install Windows 11 on your computer.
Click the
Next
button.
Click the
“Skip”
button in the “Something went wrong” error page.
Continue with the
out-of-the-box experience (OOBE)
.
After you complete the steps, the wizard will set up the new installation of Windows 11 without bloatware. However, this option will not install the promotional apps, and you will still see apps and features you may consider bloatware, such as
Microsoft Edge
, Xbox, and others.
Updated March 8, 2024:
This guide has been updated to ensure accuracy and add additional details.