-
To stop the open file security warning on Windows, open the Internet
Options
>
Security
>
Local intranet
>
Sites
, only check the check
“Include all local (intranet) sites not listed in other zones”
and
“Include all network paths (UNCs),”
click on
“Advanced,”
and add the network address.
UPDATED 5/7/2024:
On
Windows 11
(and Windows 10), if you have a NAS (Network Attached Storage) to share files across the network with solutions like unRAID or TrueNAS, you may encounter different Windows Security warnings when opening files.
For example, when moving files between folders, you may see the warning:
“These files might be harmful to your computer.” “Your Internet security settings suggest that one or more files may be harmful.”
Or if you try to run an application, Windows Security may show you the
“We can’t verify who created this file”
warning, along with the “This file is in a location outside your local network. Files from locations you don’t recognize can harm your PC.”
Although you can confirm and open the files, getting the same messages every time you access the network share can be annoying. However, you can adjust the Windows internet settings if you get these or other security warnings to resolve the issue.
In this
guide
, I’ll teach you how to stop the Windows Security warning when accessing shared folders on the local network.
-
Disable security warnings opening network files on Windows 11
-
Disable security warnings opening network files on Windows 10
Disable security warnings opening network files on Windows 11
To turn off the security dialog warnings when opening files from a network share, use these steps:
Open
Settings
on Windows 11.
Click on
Network & internet
.
Click the
“Advanced network settings”
page.
Under the “Related settings” section, click on
Internet Options
.

Click the
Security
tab.
Select the
Local Intranet
zone.
Click the
Sites
button.

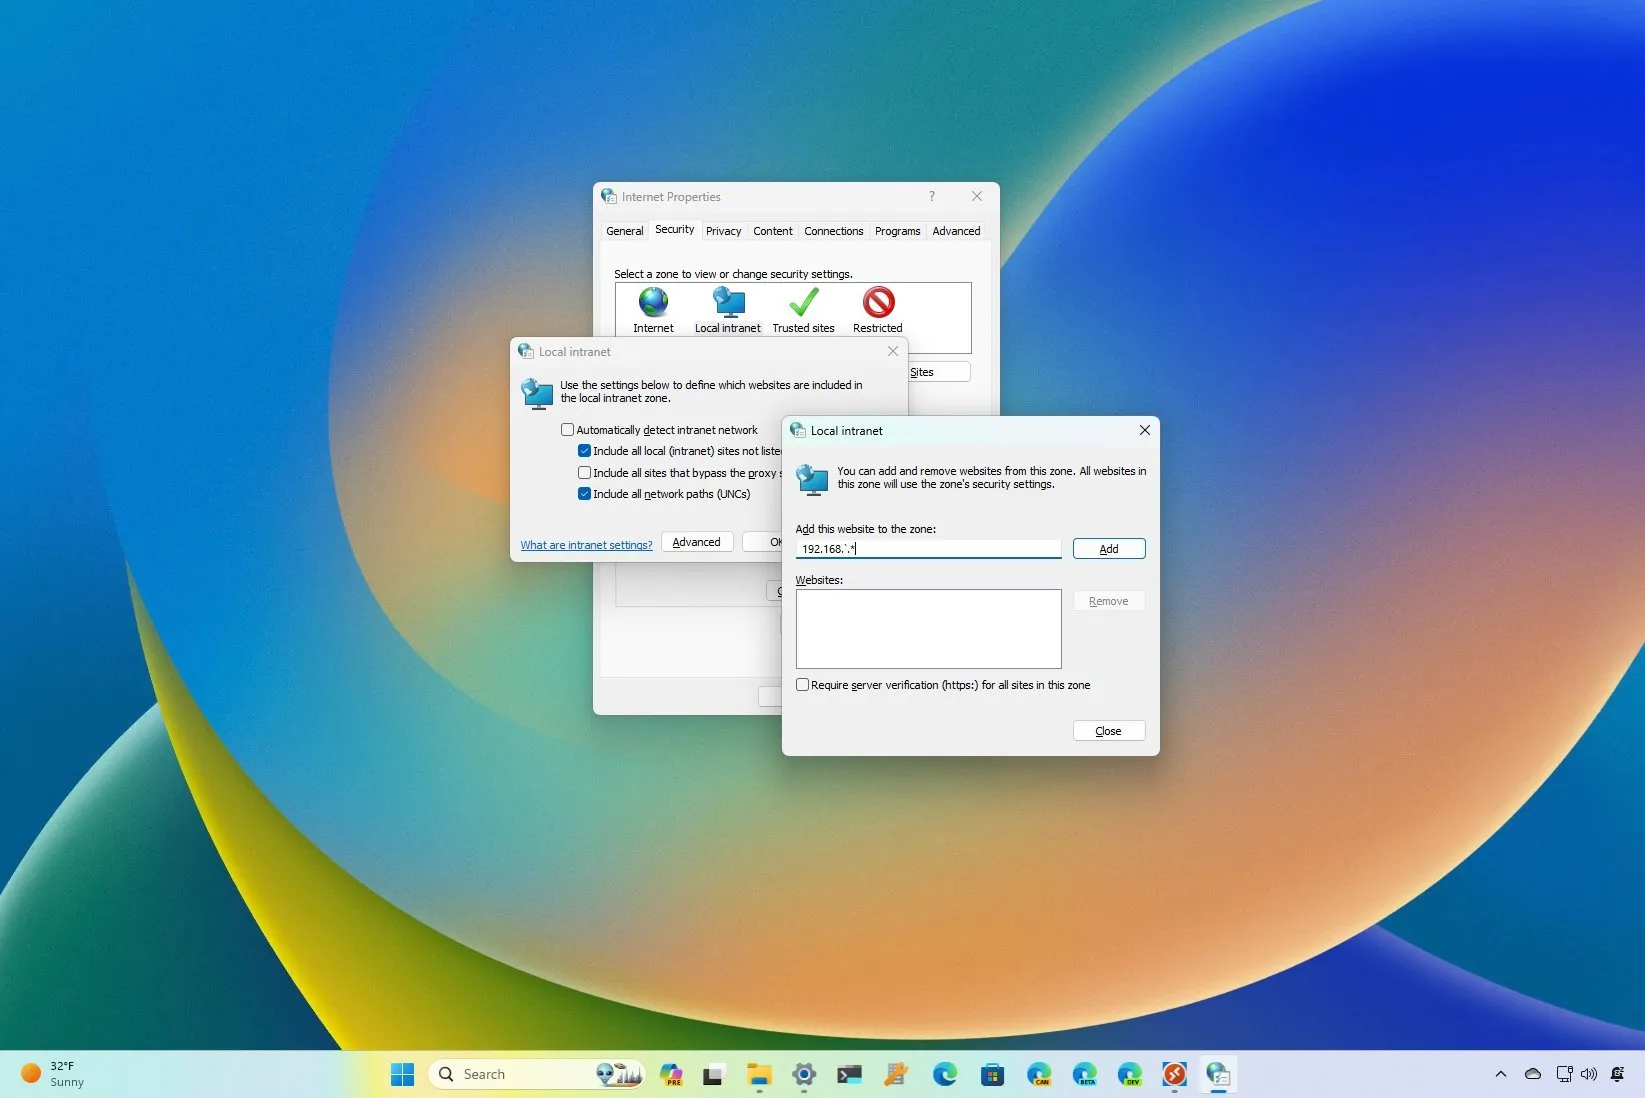
Clear the
“Automatically detect intranet network”
option.
Check the
“Include all local (intranet) sites not listed in other zones”
option.
Clear the
“Include all sites that bypass the proxy server”
option.
Check the
“Include all network paths (UNCs)”
option.

Click the
Advanced
button.
In the “Add this website to the zone” option, confirm the local network address, including an asterisk to indicate the network mask. For example, if the local network is
192.168.1.1
with a subnet mask of
255.255.255.0
, use the
192.168.1.*
address.

Click the
Add
button.
Clear the
“Require server verifications (HTTPS:) for all sites in the zone”
option.
Click the
Close
button.
Click the
OK
button.
Click the
Apply
button.
Click the
OK
button.
(Important) Restart the computer.
Once you complete the steps, the next time you open a file or an app from a network folder, Windows 11 should no longer prompt the security warning.
Disable security warnings opening network files on Windows 10
To suppress security warnings when opening network files on Windows 10, use these steps:
Open
Settings
on Windows 10.
Click on
Network & Internet
.
Click on
Status
.
Under the “Advanced network settings” section, click the
“Network and Share Center”
option.

Click the
Internet Options
from the bottom left corner.

Click the
Security
tab.
Select the
Local Intranet
zone.
Click the
Sites
button.
Clear the
“Automatically detect intranet network”
option.
Check the
“Include all local (intranet) sites not listed in other zones”
option.
Clear the
“Include all sites that bypass the proxy server”
option.
Check the
“Include all network paths (UNCs)”
option.
Click the
Advanced
button.
In the “Add this website to the zone” option, confirm the local network address, including an asterisk to indicate the network mask. For example,
192.168.1.*

Click the
Add
button.
Clear the
“Require server verifications (HTTPS:) for all sites in the zone”
option.
Click the
Close
button.
Click the
OK
button.
Click the
Apply
button.
Click the
OK
button.’
(Important) Restart the computer.
After you complete the steps, the next time you work with a network folder, Windows 10 should no longer show the security warning.
This video tutorial includes the instructions to complete this configuration on both versions of Windows:
Update May 7, 2024:
These instructions have been updated to ensure accuracy and add the steps to complete this process on Windows 11.