- To safely remove Linux from a dual-boot setup using Windows 11 (or 10), you must first access WinRE to start the device in the UEFI firmware settings and change the boot manager from Linux to Windows.
- The next step is to boot into Windows, delete the partition containing the Linux installation, and either extend or create a new partition using the unallocated space.
- The third step is to delete the Linux boot manager from the Windows system partition and then remove the Linux Grub entry from the UEFI firmware.
If you have a dual-boot system using a Linux distribution (such as Ubuntu, Mint, or Fedora) and
Windows 11
(or 10), but it’s now time to remove the Linux installation to revert to a single boot using only Windows, this is possible, but it’s not a straightforward process.
Setting up a
dual-boot configuration with Linux and Windows
isn’t complicated. You have to shrink the Windows partition or use a secondary drive to install Linux. However, if you no longer need the Linux installation, you have to complete several steps, including switching the bootloader in the UEFI firmware settings, deleting the partition with the Linux distro, relocating the unallocated space, modifying the Windows recovery partition to remove the Linux bootloader and changing the UEFI settings to remove the Linux bootloader entry.
In this
guide
, I’ll outline the steps to safely uninstall or remove the Linux installation from a dual-boot system alongside Windows 11 or 10.
Remove Linux from dual-boot setup (safely)
To remove Linux from a dual-boot system to start with the Windows 11 (or 10) boot manager, use these steps:
Start the computer on Windows.
Open
Settings
.
Click on
System
.
Click the
Recovery
page.
Click the
Restart now
button from the “Advanced startup” section.

Click the
Restart
button again.
Click on
Troubleshoot
.
Click on
Advanced
options.
Click the
“UEFI Firmware Settings”
option.

Click the
Restart
button.
Open the setup page.
Open the
“Configure boot options”
page.

Click the
“Change boot order”
option.

Change the boot order to make the Windows Boot Manager the first option and Linux the second option.

Save the changes and exit to restart the computer on Windows 11 (or 10).
Open
Start
.
Search for
Create and format hard disk partitions
and select the top result to open the
Disk Management
tool.
Confirm the partition containing the Linux setup in dual-boot.
Right-click the partition and select the
Delete Volume
option.

Click the
Yes
button to confirm.
(Optional) Right-click the
Unallocated
space and choose the
Extend Volume
.
Click the
Next
button.
Confirm the volume information.
Click the
Next
button.
Click the
Finish
button.
Open
Start
.
Search for
Command Prompt
, right-click the top result, and choose the
Run as administrator
option.
Type the following command to launch the DiskPart tool and press
Enter
:
Type the following command to view the available drives and press
Enter
:
Type the following command to select the primary drive and press
Enter
:
Type the following command to list the partitions and press
Enter
:

Type the following command to select the
“System”
partition and press
Enter
:
In the command, change
“1”
to the number corresponding to your “System” partition.
Type the following command to mount the storage with a drive letter and press
Enter
:

Type the following command to exit from DiskPart and press
Enter
:
Type the following command to enter the new system drive and press
Enter
:
Type the following command to access the boot manager configuration and press
Enter
:
Type the following command to view the boot manager options, identify the Linux bootloader, and press
Enter
:
Type the following command to remove the Linux boot manager from your computer and press
Enter
:

In the command, change
“ubuntu”
to the name of the Linux bootloader installed on your computer.
Type the
“Y”
key and press
Enter
.
Type the following command to confirm the Linux bootloader has been deleted and press
Enter
:

Type the following command to launch the DiskPart tool and press
Enter
:
Type the following command to view the available volumes and press
Enter
:
Type the following command to select the volume with the letter to delete and press
Enter
:
Type the following command to remove the drive letter and press
Enter
:
Type the following command to exit from DiskPart and press
Enter
:
Open
Settings
.
Click on
System
.
Click the
Recovery
page.
Click the
Restart now
button from the “Advanced startup” section.
Click the
Restart
button again.
Click on
Troubleshoot
.
Click on
Advanced options
.
Click the
“UEFI Firmware Settings”
option.
Click the
Restart
button.
Open the setup page.
Open the
“Configure boot options”
page.
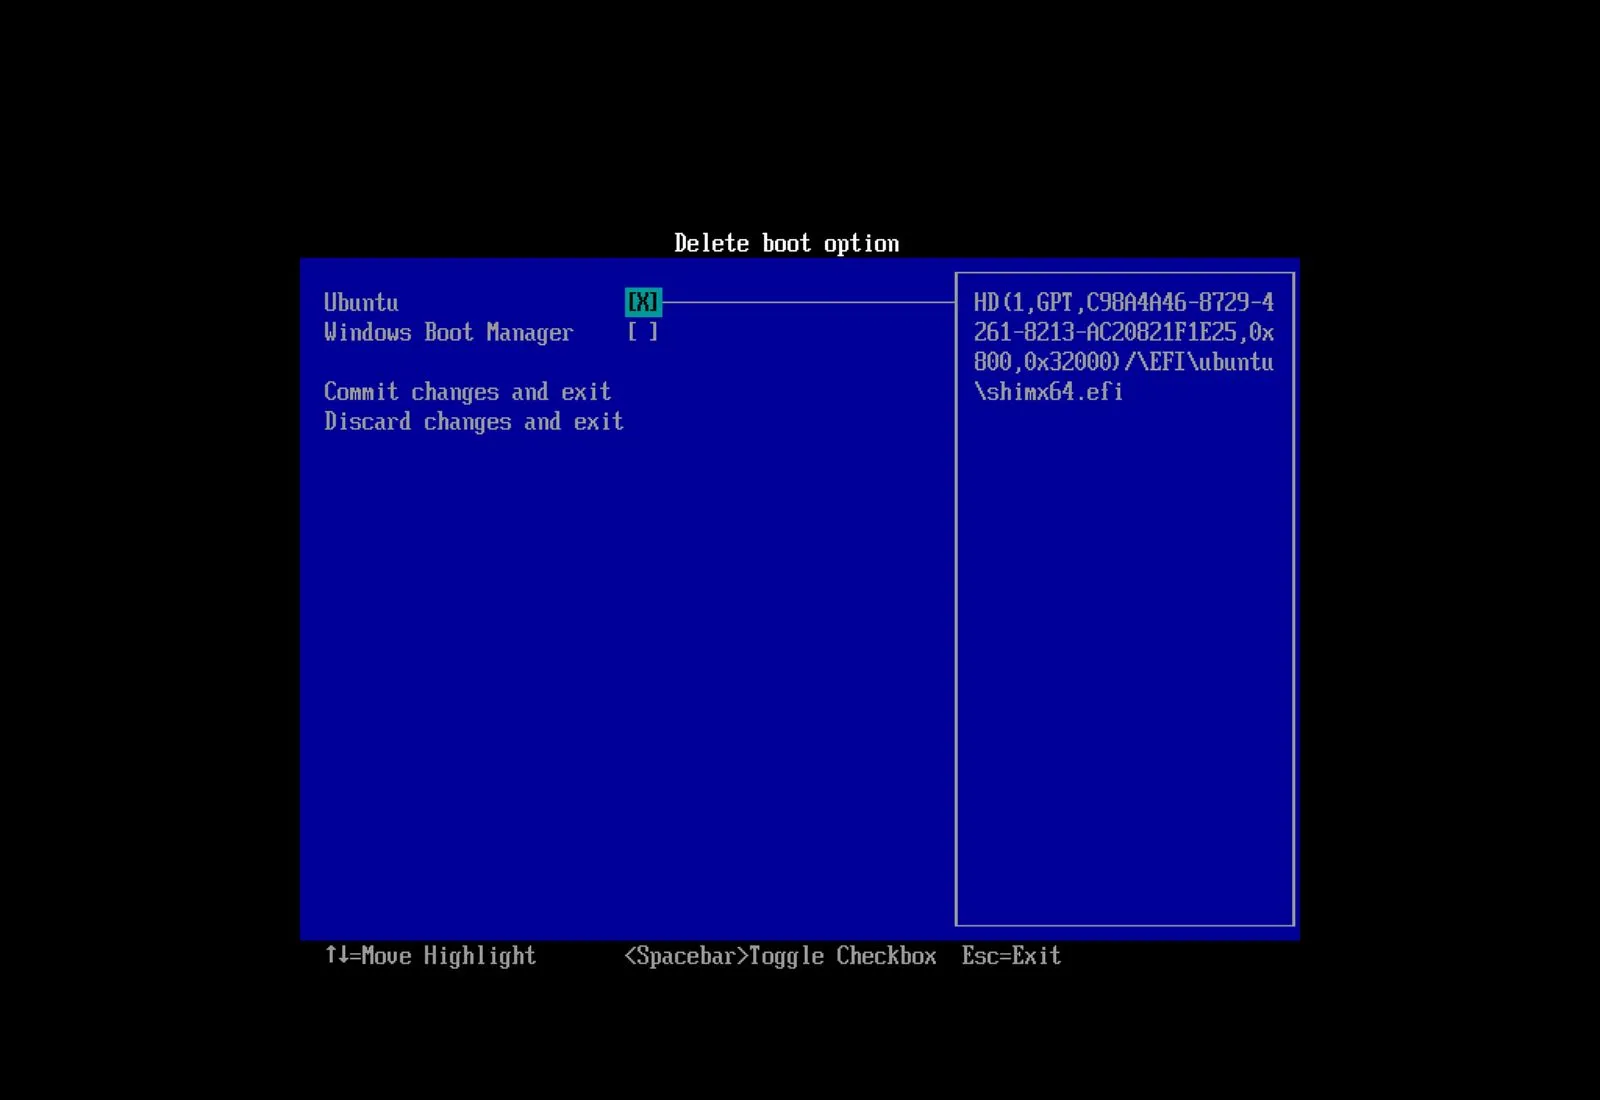
Click the
“Delete boot option”
setting.

Choose the Linux Grub entry to remove from the UEFI (in my case, Ubuntu).

Save the changes to the delete entry and exit to restart the computer on Windows 11 (or 10).
Once you complete the steps, you will have successfully removed Linux from the dual-boot setup, and now, Windows should start correctly in a single-boot setup.
You may also use the
bcdedit
with the
“enum”
option to delete the Linux bootloader from the dual-boot setup, but while creating this guide, the Ubuntu entry did not show up in the list of bootloaders. As a result, I opted to mount the recovery drive and delete the entry manually.
Although it’s possible to revert to a single boot system, ideally, you want to restore the previous configuration from a backup or perform a
clean install of Windows 11
to ensure the stability and reliability of the system.
If you have any questions or problems uninstalling Linux from your dual-boot setup, leave me a comment below.